Autumn is here: get your garden tools sorted after summer
Share
With garden tools, you’ve got two things to worry about - rusty tools and rubbish handles. Being rusty means it won’t work as well as it ought (making the jobs so much harder) and rubbish handles make for uncomfortable gardening (from blisters to splinters and calloused hands).
No fear, it’s as easy as 1, 2, 3 to maintain your garden tools (rather than buying new ones), and we've got all the kit you need to use to look after them.
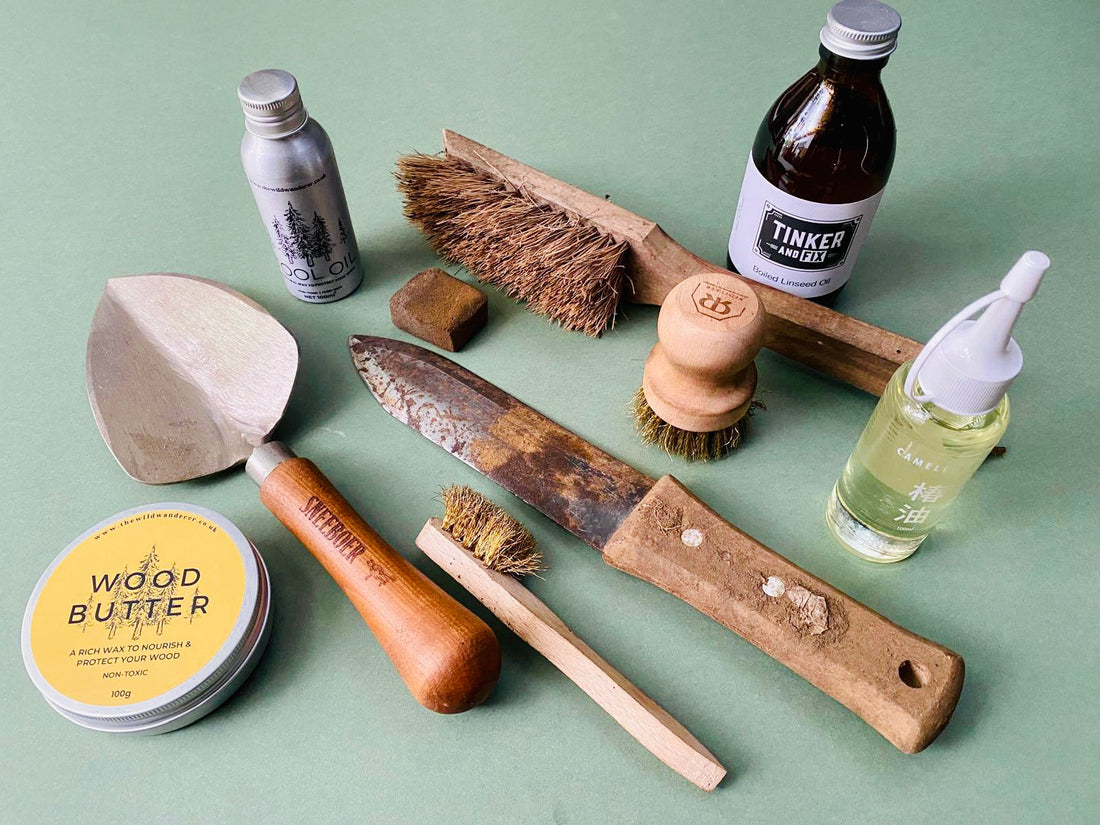
Firstly clean the tools first so you can clearly see the surface of the tool and particularly what state the bevel edge is in. If the tools are stainless steel, you can just use a stiff gardening brush to remove any dirt and mud. You don't need to look any further than investing in our garden tool brush, and for £7 you'll give you are on your way to giving your spades and gardening tools a fresh lease of life.
If your tools aren’t stainless steel and you have some surface rust, you will need to tackle this. Don’t panic, all steel tools will rust. If they are used or stored in damp conditions this process will be sped up. If you keep on top of cleaning rust off, with regular maintenance, then it won’t have the chance of causing major issues. Cleaning methods split into two general techniques – physical or chemical.
Physical cleaning: You can use various wire brushes to physically remove rust from the surface of the tool. For general maintenance a brass brush is great at removing light surface rust without being too aggressive to the metal itself. If you want to restore a very heavily corroded tool, then you might need to switch to a steel wire brush. These are stiffer and remove more material. You are really just trying to remove any loose rust from the surface, you can remove the entire surface to go back to shiny metal, but it will just start to rust again! You can get wire wheel attachments for power tools such as angle grinders, but I’d advise against them. They are fondly referred to as “Satan’s Wheels” for a reason ...
For cutting tools like secateurs and shears we'd recommend a product called Crean Mate. It's a rubber and grit compound that you use like a pencil eraser to remove light rust and sap from cutting blades.
Chemical Cleaning: There are chemical rust treatments that stabilise rust and prevent further deterioration for a period of time. But they are chemical and relatively expensive to use over large surface areas such as spades - so we reckon they’re unnecessary. Especially when using cleaning vinegar works well and is a much cheaper alternative. Cleaning vinegar can be purchased easily from a lot of Refill/Eco shops where it’s sold as a general cleaning solution. Or, if you can find it, then White Vinegar can be bought from most supermarkets. It’s not as acidic as cleaning vinegar so it’s not as effective, but close. To use it, give the tool you are looking to treat a quick clean off. You’ll need a container that allows the metal areas of the tool to be submerged. Then it’s just a case of leaving things to soak for 24hrs or so. The process is quicker in a warmer environment. You’ll notice the metal turning from a rusty brown to a black colour. Remove from the vinegar, rinse off with warm water and then dry off. This process won’t get you back to shiny metal but the rust will be removed.
With handles, you want to give them a clean up too with a stiff brush so you can see the state of the wood. That might be all they need but if they are particularly rough then you could use a 400 or 600 grit sandpaper. There's no need to go too crazy with the sanding as very smooth handles are harder to hold.
Secondly you need to sharpen, to file the edge back in to your trowels or spades. Sneeboer do a great file, which is a good investment to keep these quality tools sharp (and, to be honest, a really good gift for gardeners who love their Sneeboer tools). Or, if you don't require a fine edge, you can't beat a twin diamond file which can be used dry. If you prefer using sharpening stones, go for a Niwaki 1000 grit sharpening stone (which needs to be soaked for 5 minutes prior to using) and if you have any tools with a curved bevel, you'd need a rat’s tail file (a thin round file which looks like a rat’s tail– which you can run along curved edges.)
How do you do it? Just lay your file onto the angle of the bevel and follow this angle by working the file gently up and down. You aren’t looking to create a knife edge, just to put the bevel back in to the tool. Most garden tools have a bevel on just one side (they are single bevelled) meaning you only have to work your file in this one direction (a kitchen knife or penknife has a bevel on both sides, so you have to file each side). To check if you’re happy with the sharpened edge, just carefully run your figure over the bevel to feel that it’s sharp – if not, keep filing until you are happy. Once done, turn your tool over and just smooth over the backside of the tool – to take off any material that you’ve filled which has formed a burr.
Finally you should then think about protecting your garden tools: Camelia Oil is a natural oil that’s perfect for lightly wiping over your garden tools to give them some protection. Linseed oil can then be wiped over the wooden handles to hydrate them and stop them from cracking from sun damage.
For the handles of hand tools you could also use a wax like The Wild Wanderers Wood Butter and their Tool Oil for anything metal. Both can be simply wiped on with a sponge or cloth.
Have a look at our garden tool maintenance options here. And follow us on Instagram where you'll see Edd showing you how to do this.